
DIY Smart Home Security System: Complete Step-by-Step Installation and Automation Guide
DIY Smart Home Security System: Complete Step-by-Step Installation and Automation Guide
Home security is a top priority, and a DIY smart home security system gives full control over surveillance, alarms, and notifications. Human Insight: In my Tunis apartment, installing DIY smart sensors and cameras allowed me to monitor entry points remotely and reduced unnecessary false alerts compared to my previous commercial system.
1. Why Build Your Own Smart Security System
Commercial systems can be expensive and may lock you into contracts. DIY security provides flexibility, cost savings, and privacy. You control which devices are installed, their placement, and notification methods. Integration with smart home devices allows automation, like turning on lights when motion is detected or locking doors on a schedule. DIY also offers a hands-on learning experience with sensors, networks, and home automation.
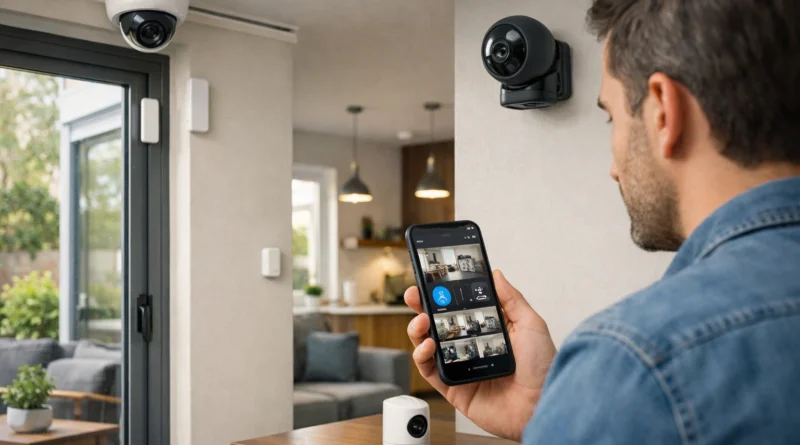
2. Understanding Smart Security Components
A complete system typically includes a control hub, sensors, cameras, smart locks, and alerts. The hub manages all devices, sensors detect activity, cameras provide visual verification, smart locks control access, and alerts notify homeowners of unusual events. Understanding device compatibility, connectivity (Wi-Fi, Zigbee, Z-Wave), and security features ensures a reliable system.
3. Components and Tools Needed
Components: Security hub (Ring, SimpliSafe, Abode), door/window sensors, motion detectors, indoor/outdoor cameras, smart locks, optional sirens or keypads.
Tools: Screwdrivers, drill, voltage tester (for locks), smartphone/tablet for app setup, notebook for layout notes. Ensure devices are compatible with your hub and network.
4. Step-by-Step Installation
Step 1 – Plan Your System: Identify entry points, high-traffic areas, and vulnerable spots. Decide camera placement, sensor positions, and door/window integration.
Step 2 – Install the Hub: Mount centrally, connect to Wi-Fi, power it, and configure initial device discovery.
Step 3 – Install Sensors: Attach door/window sensors and motion detectors at strategic points. Test connectivity.
Step 4 – Install Cameras: Mount indoor/outdoor cameras, connect power or batteries, pair with hub/app, and test streaming and motion alerts.
Step 5 – Install Smart Locks: Replace locks per instructions, connect to hub/app, and test remote locking/unlocking.
Step 6 – Configure Automation: Set routines like arming the system when leaving home, triggering lights on motion, sending notifications, and auto-lock schedules.
Step 7 – Test the Entire System: Trigger sensors and locks, verify notifications, ensure cameras record properly, and adjust placement or settings.
5. Advanced Automation Ideas
- Presence Simulation: Turn on lights and devices when away to deter intruders.
- Night Mode: Arm doors, windows, and motion sensors at bedtime automatically.
- Geofencing: Disarm system automatically when homeowner approaches.
- Integration with Smart Lighting: Lights respond to motion detection.
- Voice Assistant Control: Arm/disarm via Alexa or Google Assistant.
6. Troubleshooting Common Issues
- Sensors Not Responding: Check battery, hub connection, and placement.
- Cameras Not Streaming: Verify Wi-Fi, app setup, and firmware.
- Smart Locks Not Responding: Check battery, network connection, and correct pairing.
- False Alerts: Adjust sensor sensitivity, reposition devices, or refine automation rules.
7. Security and Privacy Considerations
- Use strong passwords for hub and devices.
- Enable two-factor authentication when possible.
- Update firmware regularly.
- Limit cloud storage for privacy.
- Encrypt device communication where possible.
8. Practical Applications
- Entry Points: Monitor doors and windows.
- Indoor Areas: Detect motion in living areas, hallways, or basements.
- Outdoor Surveillance: Cover driveways, patios, and gardens.
- Vacation Mode: Automate lights and alerts to simulate presence.
- Remote Management: Monitor and control all devices from a smartphone.
9. Energy and Cost Efficiency
Smart automation reduces unnecessary device usage. Lights activate only when motion is detected, saving electricity. Efficient planning avoids over-purchasing devices, reducing cost while maximizing security coverage.
10. FAQ – DIY Smart Home Security
Q1: Can I integrate cameras from different brands? A: Yes, if compatible with the hub; otherwise, stick to one ecosystem.
Q2: Do smart locks require professional installation? A: Most DIY-friendly models can be installed by homeowners.
Q3: Is Wi-Fi enough, or do I need a hub? A: Hubs offer better reliability and multi-device management.
Q4: Can I receive alerts without a subscription? A: Basic notifications are usually free; advanced monitoring may need a subscription.
Q5: How long does installation take? A: 4–8 hours depending on the number of devices.