
Building a DIY Smart Irrigation System: Step-by-Step Guide for Water Efficiency
Building a DIY Smart Irrigation System: Step-by-Step Guide for Water Efficiency
Water conservation is essential for both the environment and reducing utility bills. A DIY smart irrigation system automates watering schedules, monitors soil moisture, and responds to weather, saving water while keeping plants healthy. Human Insight: In my Tunis garden, installing a smart irrigation controller with soil moisture sensors cut water usage by nearly 35% in the first month, without stressing the plants.
1. Why a Smart Irrigation System Matters
Traditional irrigation often wastes water with fixed schedules regardless of weather or soil conditions. A smart system adjusts watering based on soil moisture, rainfall, and temperature, reducing waste. Homeowners gain convenience, prevent overwatering, and lower water bills. DIY setups are affordable, customizable, and give direct control over system settings.
2. Understanding Smart Irrigation Technology
Smart irrigation relies on controllers, sensors, and connectivity. Controllers manage valves, sensors monitor soil moisture, temperature, or rainfall, and connectivity enables remote control via apps or hubs. Systems use Wi-Fi, Zigbee, or Bluetooth to communicate. Understanding compatibility ensures smooth operation and easy future expansion.
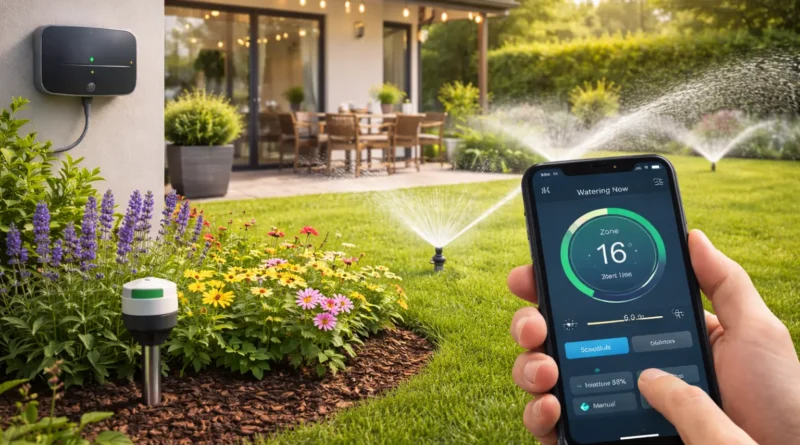
3. Components and Tools Needed
Components: Smart irrigation controller (Rachio, Rain Bird, Orbit B-hyve), soil moisture sensors, valves, tubing, sprinklers or drip emitters, optional weather station.
Tools: Screwdrivers, wire strippers, drill, tape measure, shovel (for buried lines), smartphone/tablet for configuration, notebook for layout and wiring notes.
4. Step-by-Step Installation
Step 1 – Plan Your Layout: Identify garden zones, plant types, and soil conditions. Map irrigation lines, sprinkler locations, and sensor placement for uniform coverage.
Step 2 – Install Valves and Controller: Connect valves to water supply, mount the smart controller in a sheltered location, and wire valves per instructions.
Step 3 – Install Sensors: Place soil moisture sensors near roots at representative points. Calibrate for accurate readings.
Step 4 – Connect to Network and App: Pair controller with Wi-Fi or hub, link sensors, and configure zones in the app. Test manual watering, zone activation, and sensor feedback.
Step 5 – Program Watering Schedules: Set schedules, soil moisture thresholds, and weather-based adjustments. Follow local watering regulations.
Step 6 – Test the System: Run each zone, check sprinkler coverage, observe sensor feedback, and adjust watering duration or placement.
5. Advanced Automation Features
- Weather-Based Adjustments: Reduce watering automatically during rain or cool temperatures.
- Soil Moisture Control: Water only when moisture falls below a set threshold.
- Zone Customization: Adjust water levels by plant type and sun exposure.
- Notifications: Receive alerts for errors, leaks, or low water pressure.
6. Troubleshooting Common Issues
- Controller Not Connecting: Verify Wi-Fi, firmware, and app configuration.
- Sprinklers Not Activating: Check wiring, valves, and power supply.
- Sensor Errors: Recalibrate, reposition, or replace faulty sensors.
- Leaks or Water Pressure Problems: Inspect tubing, connections, and valves for blockages or damage.
7. Energy and Water Efficiency Benefits
Smart irrigation optimizes water usage and reduces pumping energy. Example: A traditional system using 1000 liters/week can drop to 600 liters/week (~40% savings) with smart moisture-based scheduling. Benefits include lower water bills, healthier plants, and reduced environmental impact.
8. Practical Applications
- Home Garden: Efficiently water flowers, shrubs, and lawns.
- Vegetable Patches: Maintain consistent soil moisture for optimal crop growth.
- Ornamental Plants: Protect delicate plants from overwatering.
- Community Gardens: Manage multiple zones remotely with minimal human effort.
- Small-Scale Agriculture: Scale for small farms or greenhouses with sensors and app control.
9. Safety Considerations
- Turn off water supply during installation.
- Follow electrical safety if wiring valves to power sources.
- Secure sensors and tubing to prevent tripping hazards.
- Regularly inspect system integrity to prevent leaks or malfunctions.
10. FAQ – DIY Smart Irrigation
Q1: Can I expand the system later? A: Yes, design controller and wiring for future zones.
Q2: Are sensors necessary? A: They improve efficiency significantly but are optional for small zones.
Q3: Can I use drip irrigation instead of sprinklers? A: Yes, smart controllers support both.
Q4: Do I need internet access? A: App control and updates require internet; some systems work offline with local schedules.
Q5: How long does setup take? A: Typically 4–8 hours depending on garden size and number of zones.